Small garages often struggle with poor lighting. Dark corners and uneven brightness can make simple tasks frustrating. However, hex lights offer an innovative solution that transforms your workspace. These modular lighting systems create uniform illumination while adding a modern aesthetic touch.
Designing a hex light pattern requires careful planning. You need to consider your garage’s dimensions, your work requirements, and your budget. Additionally, proper installation ensures maximum effectiveness and longevity. This guide will walk you through every step of creating the perfect hex light setup for your small garage.
Understanding Hex Light Technology
Hex lights are hexagonal LED panels that connect together. They create honeycomb patterns on walls or ceilings. Each panel typically measures between 4 to 10 inches per side. Therefore, they offer flexibility in design and coverage.
These lights provide several advantages over traditional fixtures. First, they distribute light evenly across surfaces. Second, they consume less energy than conventional bulbs. Third, they generate minimal heat during operation. Moreover, most hex lights feature touch-sensitive controls and smartphone connectivity.
The modular nature makes them ideal for small spaces. You can start with a few panels and expand later. Furthermore, installation usually requires no electrical expertise. Most systems use adhesive backing or simple mounting clips.
Measuring Your Garage Space
Accurate measurements form the foundation of good design. Start by recording your garage’s length, width, and ceiling height. Then, identify areas that need the most light. Work benches, tool storage, and vehicle parking spots typically require brighter illumination.
Consider the existing light sources in your space. Natural light from windows affects your hex light needs. Similarly, overhead fixtures or wall-mounted lamps impact your design choices. Therefore, observe your garage at different times of day.
Sketch a simple floor plan on paper. Mark obstacles like garage door tracks, storage shelves, and ceiling beams. These elements influence where you can mount hex lights. Additionally, note electrical outlets if you choose powered systems.
Calculating the Number of Hex Lights Needed
Small garages typically range from 200 to 400 square feet. Industry experts recommend 50 to 75 lumens per square foot for workspace lighting. According to This Old House, proper garage lighting significantly improves functionality and safety.
Individual hex light panels usually produce 100 to 300 lumens. Therefore, a 300-square-foot garage needs approximately 15,000 to 22,500 total lumens. Divide this number by your chosen panel’s lumen output. This calculation gives you the minimum number of panels required.
However, don’t forget about light distribution. Clustering all panels in one area creates bright spots and shadows. Instead, spread them across your ceiling or walls strategically. Additionally, plan for 10 to 20 percent more panels than your calculation suggests. This buffer ensures adequate coverage.
Choosing the Right Hex Light Pattern
Several popular patterns work well in small garages. The grid pattern arranges panels in straight rows and columns. This classic design provides uniform coverage and looks organized. Moreover, it simplifies installation since measurements remain consistent.
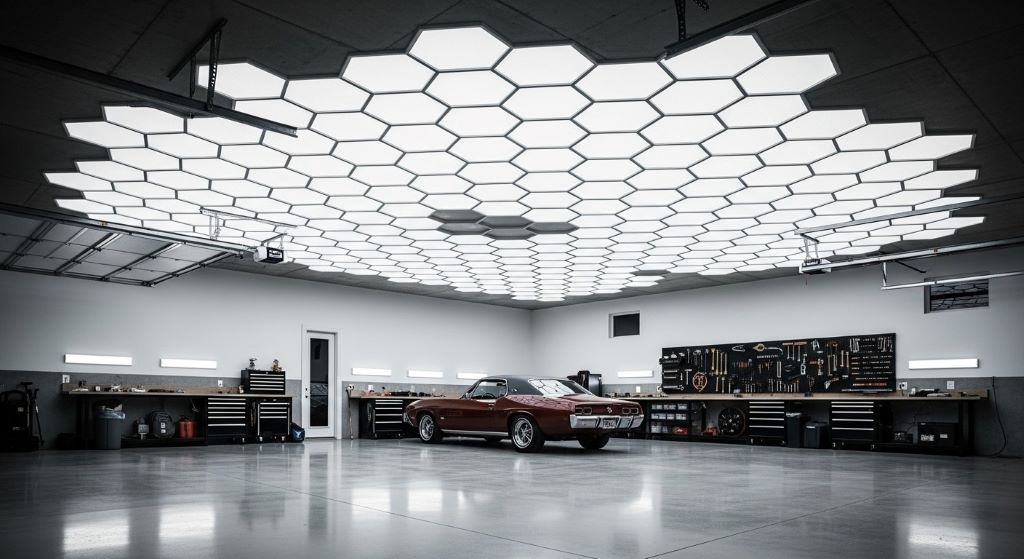
The honeycomb pattern mimics natural bee colonies. Panels connect along their edges without gaps. This arrangement maximizes coverage while using fewer panels. Furthermore, it creates an interesting visual effect that enhances your garage’s appearance.
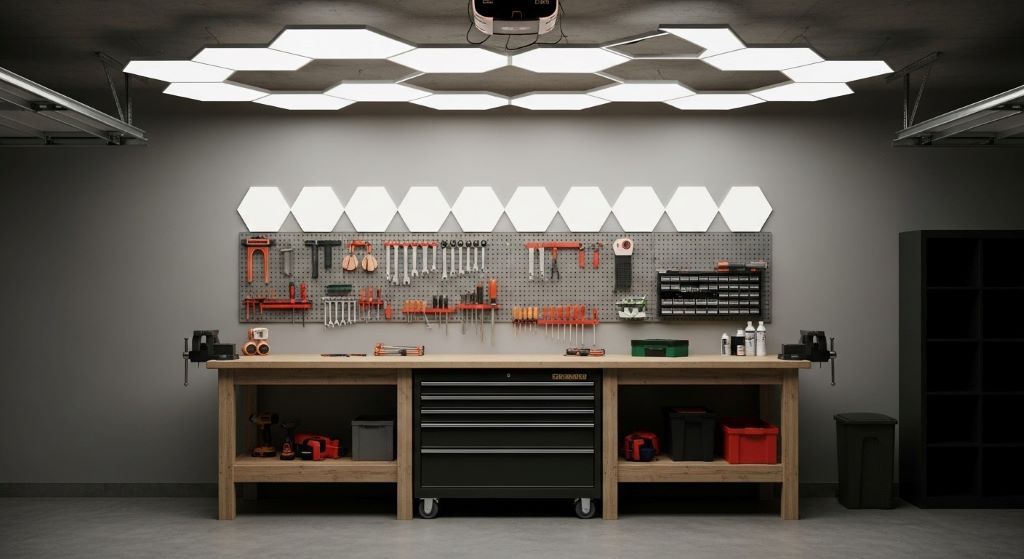
The corner cluster pattern concentrates lights in workspace areas. Place groups of panels above work benches or tool stations. Then, use single panels or small clusters elsewhere. This approach prioritizes task lighting over ambient illumination.
Consider the gradient pattern for creative designs. Start with dense panel concentration in one area. Gradually reduce density as you move toward less critical zones. This technique creates visual flow while maintaining functionality.
Selecting the Appropriate Color Temperature
Color temperature dramatically affects your garage’s atmosphere. Measured in Kelvin, it ranges from warm to cool tones. Warm white sits between 2700K and 3000K. It creates a cozy, relaxing environment suitable for hobby spaces.
Neutral white ranges from 3500K to 4100K. This balanced tone works well for general garage use. It provides clear visibility without harsh brightness. Additionally, neutral white reduces eye strain during extended work sessions.
Cool white falls between 5000K and 6500K. This crisp, bright light closely mimics daylight. Professionals prefer it for detailed work requiring color accuracy. However, some people find it too clinical for comfortable spaces.
Many hex light systems offer adjustable color temperatures. These RGB or tunable white panels let you change settings instantly. Therefore, you can switch between warm evening ambiance and bright daytime work light. This flexibility makes them ideal for multipurpose garages.
Planning Your Installation Layout
Transfer your measurements and calculations onto your sketch. Draw hexagons representing each panel’s position. Maintain consistent spacing between panels for professional appearance. Most systems look best with 1 to 3 inches between adjacent panels.
Start your layout from the center of your ceiling or wall. Working outward ensures balanced coverage. Mark your central point clearly before beginning installation. Additionally, use a level and measuring tape to maintain straight lines.
Account for mounting surface materials in your plan. Drywall, concrete, and metal require different installation approaches. Some hex lights use adhesive mounting, while others need screws or anchors. Therefore, check your system’s requirements before finalizing placement.
Consider cable management for powered systems. Plan routes that hide wires along ceiling joists or wall corners. Use cable clips or conduits for neat organization. Moreover, ensure power sources can handle your system’s electrical load.
Installation Tips and Best Practices
Clean your mounting surface thoroughly before installation. Dust and grease prevent proper adhesion. Use isopropyl alcohol for best results. Then, let the surface dry completely before applying panels.
Install your central panel first as a reference point. Double-check its position using your measurements and level. This anchor panel guides the placement of surrounding hexagons. Additionally, take your time with this critical first step.
Most hex light systems use connector clips between panels. These clips ensure proper alignment and electrical connection. Press firmly until you hear or feel them click. However, avoid using excessive force that might damage components.
Test your lights after installing every few panels. This practice identifies connection problems early. Fixing issues becomes harder once many panels are mounted. Therefore, periodic testing saves time and frustration.
According to Family Handyman, upgrading garage lighting ranks among the most impactful home improvements. The investment pays dividends through improved usability and property value.
Customizing Your Hex Light System
Many hex light systems offer smart features worth exploring. Smartphone apps let you adjust brightness and color remotely. Schedule automatic on and off times to save energy. Furthermore, some systems integrate with voice assistants for hands-free control.
Add motion sensors to enhance convenience. Lights activate automatically when you enter the garage. They turn off after a preset period of inactivity. This feature proves especially useful when carrying items.
Experiment with dynamic lighting effects for special occasions. Rainbow cycles, color waves, and pulsing patterns add entertainment value. However, stick with steady white light for actual work sessions. These effects can distract and reduce productivity.
Create lighting zones for different garage areas. Control work bench lights separately from general illumination. This segmentation provides flexibility and energy savings. Additionally, it extends bulb life by avoiding unnecessary use.
Maintenance and Troubleshooting
Hex lights require minimal maintenance compared to traditional fixtures. Dust panels occasionally with a soft, dry cloth. Avoid harsh chemicals that might damage plastic surfaces or LEDs. Additionally, check connections periodically to ensure continued functionality.
Most LED hex lights last 30,000 to 50,000 hours. This longevity translates to years of reliable service. However, individual panels may occasionally fail or disconnect. Keep spare connectors and mounting supplies on hand for quick repairs.
If panels stop working, check power connections first. Loose adapters or tripped breakers cause most issues. Then, examine connector clips between panels. Reseating connections often resolves communication problems.
Software glitches sometimes affect smart hex light systems. Restart your panels by unplugging them for 30 seconds. Update firmware through the manufacturer’s app when available. These simple steps fix most digital issues.
Budget Considerations and Cost Savings
Hex light system costs vary widely based on features. Basic panels start around 3 to 5 dollars per hexagon. Premium smart systems can reach 10 to 15 dollars per panel. Therefore, determine your must-have features before shopping.
Calculate total project costs including panels, connectors, and mounting supplies. Add 15 percent for unexpected expenses or additional panels. Compare this figure against traditional lighting installation costs. Often, hex lights prove more economical when considering DIY installation.
Watch for sales and bundle deals from manufacturers. Buying complete starter kits costs less than individual panels. Moreover, some retailers offer seasonal discounts on lighting products. Patience can yield significant savings.
Consider energy savings in your budget analysis. LED hex lights use 75 percent less electricity than incandescent bulbs. They also eliminate frequent bulb replacement costs. Therefore, the initial investment pays back through reduced operating expenses.
Conclusion
Designing a hex light pattern for your small garage enhances both functionality and aesthetics. Start by measuring your space and calculating your lighting needs. Choose a pattern that matches your work requirements and personal style. Select appropriate color temperatures for your activities.
Plan your layout carefully before installation begins. Follow best practices during mounting to ensure professional results. Customize your system with smart features that add convenience. Maintain your hex lights properly for years of reliable performance.
The modular nature of hex lights makes them perfect for small garages. You can start small and expand as your budget allows. Additionally, the DIY installation saves money compared to traditional electrical work. Transform your garage into a well-lit, inspiring workspace with thoughtfully designed hex light patterns.
Frequently Asked Questions
How many hex lights do I need for a 200-square-foot garage?
A 200-square-foot garage typically needs 10,000 to 15,000 lumens for adequate task lighting. If each hex panel produces 150 lumens, you would need approximately 67 to 100 panels. However, the actual number depends on your ceiling height, desired brightness level, and how you arrange the panels.
Can I install hex lights on concrete garage ceilings?
Yes, you can install hex lights on concrete ceilings using appropriate mounting methods. Adhesive-backed panels may not stick well to textured concrete. Instead, use concrete anchors and screws with mounting clips. Alternatively, install a plywood backing board first, then mount hex lights to the smooth surface.
Do hex lights work in cold garages?
Most LED hex lights function well in cold environments. LEDs actually perform more efficiently in cooler temperatures. However, extreme cold below minus 20 degrees Fahrenheit may affect some components. Check your specific product’s operating temperature range before installation in unheated garages.
Are hex lights bright enough for automotive work?
Yes, hex lights provide sufficient brightness for automotive work when properly designed. Choose panels with high lumen output and cool white color temperature. Concentrate panels above your work areas for task lighting. A well-designed hex light system can deliver 75 to 100 lumens per square foot needed for detailed mechanical work.
Can I connect hex lights from different brands?
Generally, hex lights from different manufacturers do not connect together. Each brand uses proprietary connector designs and control systems. Mixing brands results in compatibility issues and inconsistent lighting. Stick with one manufacturer’s ecosystem for reliable performance and expandability.
Related Topics:
IKEA commitment to “smart home” and launches collection of intelligent lighting
This switch lets you turn on and turn off the lights with a simple gesture


