DIY projects feel exciting until the first “simple cut” turns into splintered edges, crooked lines, and a workbench covered in frustration. The right compact saw can change that experience fast—especially when you want clean results without hauling out a full-size tool every time. If you’ve been building a small shelf, trimming flooring under a door, or cutting sheet goods in a tight workspace, you’ll appreciate why the G LAXIA Mini Circular Saw stands out among woodworking tools designed for real-world home projects.
A mini circular saw doesn’t replace every saw in a shop, but it can remove most of the friction that slows down DIY: setup time, awkward handling, and inconsistent results. Below, you’ll learn exactly how this tool makes work easier, what it does best, how to use it safely, and how to get cleaner, more accurate cuts even if you don’t consider yourself “handy” yet.
Why DIYers Struggle With Cuts (And How a Mini Circular Saw Helps)
Most DIY mistakes start with cutting. Cutting mistakes waste material, ruin alignment, and force you to “fix it in the next step,” which almost never works out cleanly.
According to industry experts, DIY cutting problems usually come from a few predictable causes:
- Using the wrong tool (or the right tool in the wrong way)
- Poor support under the workpiece
- Rushing layout lines and measurement
- Blade mismatch (wrong type, dull blade, or wrong tooth count)
- Unstable handling, especially on narrow boards and sheet goods
A mini circular saw addresses those pain points by improving control and reducing the tool’s “bulk penalty.” You get a saw that starts quickly, lines up easily, and handles common materials without needing a large bench setup. For many homeowners, it becomes one of those home improvement tools you reach for first because it fits the reality of limited space and limited time.
What the G LAXIA Mini Circular Saw Is Best At
The biggest advantage of a mini circular saw is not raw power—it’s precision with convenience. You’ll feel that benefit most in these scenarios.
Small-to-medium straight cuts
You can make straight cuts in boards and panels without dragging out a larger saw or setting up a full cutting station. With good marking and support, you can produce clean results for:
- Shelving and closet organizers
- Simple furniture builds (side tables, small cabinets, benches)
- Trim work and basic framing repairs
- Cutting down plywood or MDF panels to manageable sizes

Plunge-style and close-quarter cuts
Many DIYers face cuts that a standard circular saw handles awkwardly: tight spaces, close-to-wall trimming, or partial cutouts. A compact saw body and manageable footprint can help you control entry and exit points more confidently.
Based on manufacturer guidelines for compact saw operation, you should always confirm the tool allows the cut type you plan (standard through-cut vs. controlled plunge entry), then practice on scrap to dial in depth and technique.
Cleaner work with less fatigue
When you fight a heavy tool, your cut line suffers. A lighter, more compact saw helps you:
- Maintain steady forward feed
- Keep the base plate flat to the surface
- Correct drift before it becomes a ruined cut
That translates to fewer do-overs and better-looking edges—especially on visible surfaces like cabinet sides and shelves.
Key Features That Make DIY Easier (In Practical Terms)
Rather than listing features as marketing claims, let’s translate the “what” into “what it does for you.”
Compact handling = better line tracking
A mini saw’s smaller body typically gives you a better sense of where the blade sits relative to the cut line. That matters when you work with:
- Narrow boards that don’t offer much support
- Short offcuts where a full-size saw feels unstable
- One-person projects where you can’t easily hold, clamp, and cut all at once
As recommended by professionals, you should prioritize control over speed for DIY. A slower, cleaner pass beats a fast cut that chips out the edge and forces patchwork.
Depth control = fewer accidental mistakes
Depth setting matters more than most people realize. When you set the blade too deep:
- You increase kickback risk
- You create more tear-out
- You damage your sacrificial surface or workbench
- You generate more dust and noise than needed
According to widely accepted industry standards, you should set blade depth so the teeth barely clear the underside of the workpiece—often around (3) to (6) mm beyond the material thickness for typical woodworking cuts. That single adjustment can dramatically improve safety and cut quality.
Material flexibility for real DIY tasks
DIY doesn’t happen in perfect workshop conditions. You might cut:
- Plywood for a quick cabinet insert
- MDF for a painted project
- Thin boards for trim or shims
- Plastic sheet for a utility cover
- Flooring materials for repairs
The right blade choice makes all of those cuts easier and cleaner. Mini circular saws shine when you pair them with the appropriate blade for the material and finish level you want.
When to Choose the G LAXIA Mini Circular Saw Over Other Saws
Every saw has a “best use” zone. Use the mini circular saw where it wins, and you’ll feel like your skill level jumped overnight.
Choose it over a full-size circular saw when:
- You work in a small room, apartment, or cluttered garage
- You want quicker setup for short sessions
- You cut smaller parts more often than full sheets
- You care more about handling confidence than maximum depth capacity
Choose it over a jigsaw when:
- You need straighter lines with less wandering
- You want cleaner edges on long cuts
- You cut sheet goods and want the cut to look “factory straight”
Then Choose it over a miter saw when:
- You need portability to the workpiece
- You make cuts in installed materials (repair work)
- You don’t have room for a dedicated stand
That said, a miter saw still dominates repeated angle cuts and fast crosscuts, and a table saw still rules for ripping and repeatable precision. The mini saw fits between those worlds as a practical “get-it-done-cleanly” option.
Related:
How to Attach a Gable Porch Roof to House: Step-by-Step Guide for Homeowners (2025)
Does a Professional Powder Coating Gun Reduce Downtime During Changeovers
Getting Cleaner Cuts: A Simple, Repeatable Method
You don’t need fancy jigs to cut cleanly. You need a consistent process. Use this approach on most DIY cuts.
1) Mark accurately (and mark the waste)
Use a sharp pencil or marking knife where possible, and mark an “X” on the waste side. This prevents the classic mistake of cutting on the wrong side of the line.
2) Support the workpiece correctly
Support prevents binding. Binding causes stalling, burning, and kickback risk.
Use one of these setups:
- A sacrificial foam insulation board on the floor (great for sheet goods)
- Two sawhorses with a sacrificial board under the cut line
- A bench with clamps and a backer board
Keep the offcut free to fall away without pinching the blade.
3) Set the depth intentionally
Set depth just past the material thickness. This improves stability and reduces the “grab” that can happen with deeper blade exposure.
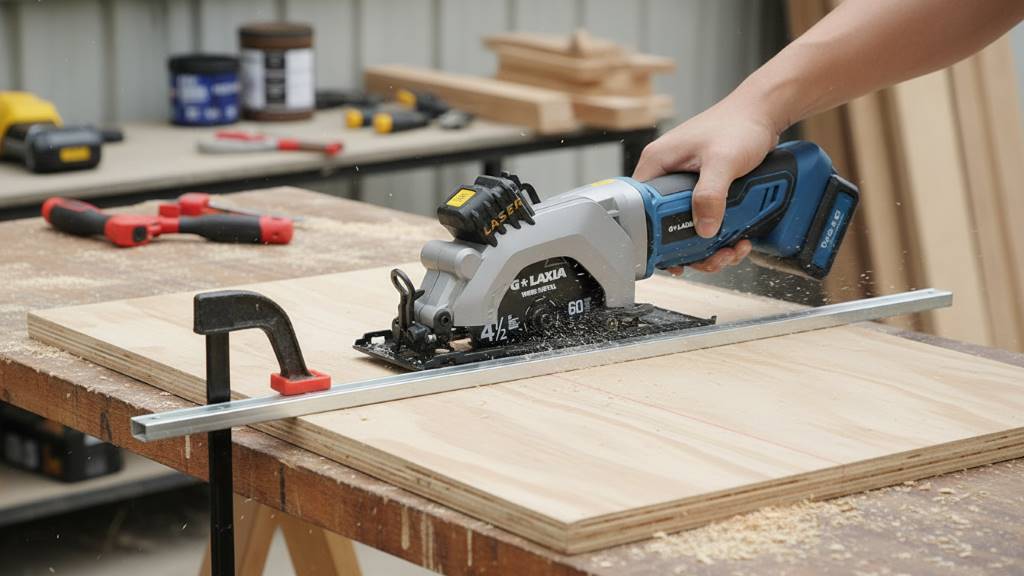
4) Use a straightedge guide
You don’t need a dedicated track system to cut straight. Clamp a straight board or level as a guide. Do a quick test pass on scrap to confirm the offset between the blade and the edge of the saw’s base.
5) Let the blade do the work
Apply steady forward pressure, but don’t force it. If you hear the saw strain, slow down. A smoother feed produces a cleaner edge and reduces chip-out.
Blade Choice: The Hidden Key to “Easy” DIY
Many DIYers blame the saw when the blade causes the problem.
Based on manufacturer guidelines and professional practice, match blades to the job:
For clean wood cuts (plywood, boards, panels)
Use a fine-tooth blade when you want a smoother edge, especially on veneered plywood.
For fast rough cuts
Use a blade intended for quicker stock removal when the edge won’t show (like hidden framing or substructure pieces).
For plastics and specialty materials
Use a blade designed for plastic to reduce melting and chipping. Keep the feed steady and avoid overheating.
Also, keep blades sharp. A dull blade increases tear-out, overheats the cut, and makes the tool feel weaker than it really is.
Safety Habits That Make You Faster (Not Slower)
Safety doesn’t slow you down—bad outcomes do. The right habits make your workflow calmer and more consistent.
As recommended by professionals, follow these practices every time:
- Wear eye protection and hearing protection
- Clamp the work whenever possible instead of “hand-holding” it
- Keep the cord clear of the cutting path
- Start the saw before contacting the material
- Maintain a stable stance and two-hand control when needed
- Stop cutting immediately if the kerf pinches or the tool chatters
Also, manage dust. Cutting MDF and other engineered panels creates fine particles. Use a vacuum attachment if available, or at minimum, cut in a ventilated area and wear a suitable mask.
Real DIY Projects Where This Saw Pays Off Quickly
If you want ROI from a tool, use it where it saves both time and materials.
Quick shelf install (closet, laundry, pantry)
- Cut shelf boards to length
- Trim support cleats
- Make clean, straight cuts without setting up a big station
Flooring and trim repairs
- Cut replacement pieces to fit
- Trim under door jambs (with the correct method and care)
- Tackle small areas without moving heavy equipment indoors
Plywood breakdown for small furniture
- Break a large sheet into smaller panels
- Reduce strain and improve control
- Cut near-final sizes before finishing with sanding or a final trim cut
Utility projects
- Cut plastic panels for covers
- Cut thin boards for garage organizers
- Make quick jigs, spacers, and brackets
These are the kinds of projects where “easy” really matters because the project itself already has enough steps.
Common Mistakes (And How to Avoid Them)
Even a great tool can’t fix a flawed setup. Avoid these mistakes and your results will improve immediately.
- Cutting without support, which causes binding and tear-out
- Setting blade depth too deep, which increases kickback risk and roughness
- Using the wrong blade type, especially on plywood and veneers
- Pushing too hard, which overheats the blade and wanders off the line
- Skipping a guide, then trying to “freehand straight” on long cuts
According to industry experts, most DIYers improve faster by mastering setup fundamentals than by buying more tools. This saw simply makes those fundamentals easier to execute consistently.
FAQ
Is a mini circular saw powerful enough for typical DIY?
Yes for many household projects, especially sheet goods, shelving, and moderate-dimension boards. You should confirm the maximum cut depth suits your material thickness, based on manufacturer guidelines.
Can I cut plywood cleanly without chipping?
Yes, if you use a fine-tooth blade and support the sheet well. You can also reduce tear-out by applying painter’s tape over the cut line or scoring the line lightly before cutting, as recommended by professionals for veneered surfaces.
What’s the best way to cut a straight line without a track?
Clamp a straightedge guide. Measure the offset between the blade and the saw’s edge once, then reuse that measurement. This method follows widely accepted industry standards for guided straight cuts.
How do I choose the right blade?
Choose based on material and finish needs: fine-tooth for clean wood cuts, purpose-built blades for plastics, and general blades for rough work. When in doubt, test on scrap and inspect the edge quality.
Is it safe for beginners?
It can be, as long as you follow core safety practices: proper support, correct depth, stable stance, and controlled feed. Never cut unsupported pieces or allow the kerf to pinch the blade.
What should I do if the saw binds mid-cut?
Stop immediately, keep the tool steady, and release the trigger. Then adjust support so the offcut can drop away without pinching. Binding often comes from poor support or internal stress in the material.
Do I need a workbench to use it?
No. You can cut safely on the floor using a sacrificial foam board, or on sawhorses with a sacrificial board. You still need stable support and a clear work area.
Can it replace a table saw or miter saw?
Not completely. A table saw excels at repeatable rips and precision joinery, and a miter saw excels at repeated crosscuts and angles. A mini circular saw fills the portable “quick, accurate cut” role that many DIY workflows need.
Conclusion: Make DIY Feel Manageable Again
DIY gets easier when your tools match your space, your schedule, and your real project needs. The G LAXIA Mini Circular Saw helps you cut with more control, set up faster, and waste less material—especially on the kind of everyday home projects most people actually do. If you want cleaner cuts without the hassle of full-size equipment, this compact saw can become one of the most practical additions to your kit of home improvement tools.
Try it on one project this week—a shelf, a plywood panel, or a simple organizer—and focus on the fundamentals: support, depth, a straightedge, and a sharp blade. You’ll see the difference immediately.

