You’ve stared at that empty patch of patio or the neglected corner of your yard long enough. Every weekend, you smell charcoal drifting from the neighbor’s house while you settle for a stovetop burger. The problem isn’t your cooking skills—it’s your setup.
A disorganized, under-equipped barbecue station turns a relaxing afternoon into a frantic hunt for tongs and a cold grill. Building the perfect backyard barbecue setup transforms chaos into control. Whether you are feeding a crowd for the Fourth of July or just grilling Tuesday chicken, the right layout, tools, and cooking surface make the difference between stress and success. This guide walks you through every decision, from grill selection to storage, so your backyard becomes the destination everyone wants to visit.
What Defines a Great Backyard Barbecue Setup?
A great backyard barbecue setup balances three elements: a reliable heat source, efficient workspace, and smart storage. It is not about spending thousands of dollars. It is about creating a workflow that keeps you cooking while your guests relax. The best setups reduce how many times you walk back into the kitchen and maximize the time you spend actually grilling.
Think of your barbecue area like a small outdoor kitchen. You need a place to prep food, a hot surface to cook it, and room to hold platters and sauces. When these zones are within arm’s reach, grilling becomes a pleasure rather than a chore. A defined cooking zone also keeps your yard safer by separating hot surfaces from play areas and foot traffic.
Essential Zones for Every Setup
- Prep zone: A weatherproof cart or side table for seasoning meat, chopping vegetables, and holding marinades.
- Cooking zone: The grill itself, positioned at least three feet from your house or any wooden fence.
- Serving zone: A clean surface where finished food rests before hitting the table.
- Storage zone: Hooks, cabinets, or bins for tools, fuel, and cleaning supplies.
Why Should You Invest in a Dedicated Outdoor Cooking Area?
Investing in a dedicated outdoor cooking area saves you time, reduces mess, and increases your enjoyment of grilling. When every tool has a home and your grill is properly positioned, you stop wasting energy on logistical problems. You focus on the food instead of hunting for a spatula.
A permanent setup also protects your equipment. Grills left exposed to the elements rust faster. A simple shelter, a grill cover, or a dedicated patio spot extends the life of your barbecue by years. Additionally, a designated cooking area adds practical value to your property. Buyers and guests notice a well-organized outdoor kitchen more than a random grill sitting on a patch of grass.
Which Grill Type Works Best for Your Needs?
Choosing the right grill depends entirely on your cooking style, fuel preference, and budget. There is no single best grill, only the best grill for you. Three main options dominate the market: charcoal, gas, and pellet. Each offers distinct advantages and trade-offs.
| Grill Type | Best For | Heat Control | Flavor Profile | Price Range |
|---|---|---|---|---|
| Charcoal | Purists who want deep smoky flavor | Manual, requires practice | Rich, smokey | $80 – $600 |
| Gas | Quick weekday dinners and convenience | Precise, instant adjustment | Clean, mild | $150 – $1,500 |
| Pellet | Low-and-slow smoking and set-it-and-forget-it | Automatic, digital control | Wood-fired, versatile | $300 – $2,000 |
If you love the ritual of building a fire and the taste of real charcoal, go with a kettle or kamado style. If you grill three times a week and value speed, a gas grill with three burners is your best bet. Pellet grills offer the best of both worlds for those who want to smoke brisket on Saturday and sear steaks on Sunday.
How Much Space Do You Really Need?
You do not need a massive yard to build a functional barbecue setup. The minimum space required is roughly a 6-foot by 4-foot area. This gives you enough room for a standard 3-burner gas grill, a small side table, and a trash bin. For larger gatherings, aim for 10 feet by 8 feet to accommodate a prep cart, cooler, and serving table.
Consider traffic flow as well. People should be able to walk behind the cook without bumping into hot surfaces. Leave at least a 3-foot gap between the grill and any high-traffic areas. Also, think about wind direction. Position your grill so smoke blows away from your seating area and dining table.
Space-Saving Ideas for Small Yards
- Use a foldable side shelf attached to your grill.
- Mount a magnetic strip on your grill cart for tools.
- Store charcoal or propane tanks in a vertical storage bin.
- Use a rolling cart that doubles as prep space and storage.
What Tools and Accessories Should You Buy First?
Start with the essentials and upgrade only after you understand your style. Many beginners overspend on gadgets they never use. Focus on function first. The core toolkit for any backyard barbecue setup includes a good spatula, a pair of long-handled tongs, a grill brush, and a reliable instant-read thermometer.
Beyond these basics, consider a few high-impact additions. A chimney starter makes lighting charcoal effortless and safe. A two-zone cooking setup (either with coals or burners) allows you to sear on one side and cook gently on the other. Grill baskets for vegetables and fish keep small items from falling through the grates. Cotton gloves with silicone grips let you handle hot grates and pans safely.
Five Must-Have Accessories
- Instant-read thermometer: Never guess doneness again. The difference between a perfect steak and a dry one is 5 degrees.
- Grill brush with replaceable heads: Clean grates prevent sticking and flare-ups.
- Basting brush with silicone bristles: Holds more sauce and won’t shed bristles onto food.
- Heavy-duty cutting board: Use it for prep and as a serving board.
- Fireproof gloves: Protect your hands when adjusting coals or hot grates.
Can You Build a Budget-Friendly Setup That Performs Well?
Absolutely. A budget-friendly backyard barbecue setup does not mean low quality. It means prioritizing value over luxury. You can assemble a performing rig for under $500 if you choose wisely. Spend the bulk of your money on the grill itself, then supplement with affordable accessories from discount stores or yard sales.
A $200 charcoal kettle grill paired with a $40 chimney starter, a $30 instant-read thermometer, and a $60 wooden prep cart gives you restaurant-quality results for under $350. The secret is technique over technology. A cheap grill in the hands of someone who understands heat zones and fire management outperforms an expensive grill used poorly.
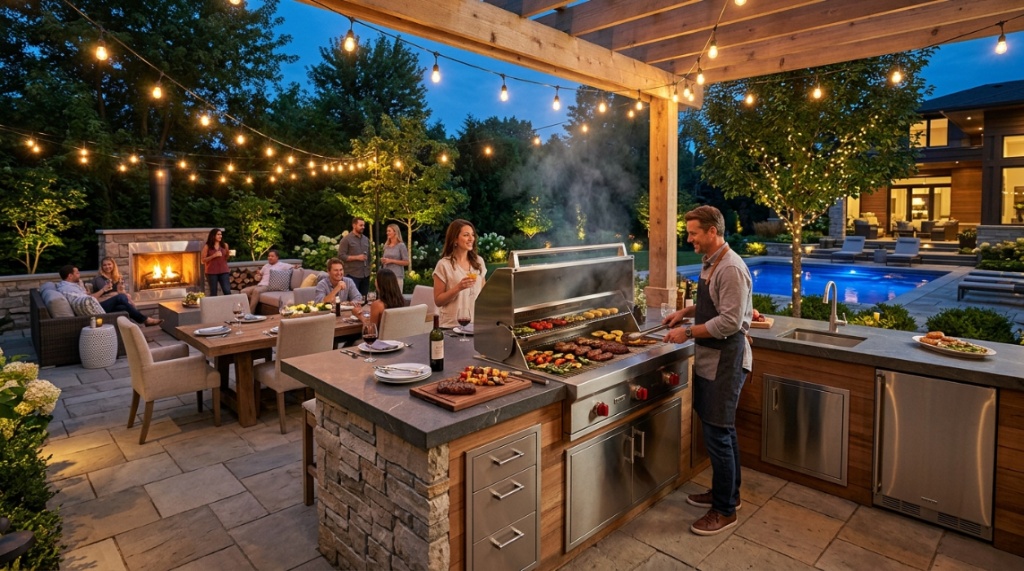
How Do You Arrange the Layout for Maximum Efficiency?
Arrange your layout in a straight line or an L-shape, depending on available space. The straight-line layout places your prep area, grill, and serving zone in sequence from left to right. The L-shape uses a corner, giving you two continuous surfaces for prep and serving. Both layouts reduce unnecessary walking.
Place your grill at standing elbow height. Most standard grills sit at 36 to 38 inches tall. If your grill sits lower, consider raising it with a durable cart or a cinder block base. Keep your prep surface directly adjacent to the dominant hand you use while grilling. If you are right-handed, place the prep table on your right side so you can reach for tools without crossing your body.
Ideal Workflow Order
- Step 1: Prep station (left side) — season and arrange raw food.
- Step 2: Grill (center) — cook food in zones.
- Step 3: Rest/serving station (right side) — hold cooked food safely.
When Should You Add a Smoker or Side Burner?
Add a smoker or side burner once you have mastered the basics and find yourself wanting more versatility. A smoker opens up low-and-slow cooking for ribs, pork shoulder, and brisket. A side burner lets you simmer sauces, sauté onions, or boil corn without running inside.
Most home cooks benefit from a side burner before a smoker. It adds immediate convenience to every cook. Smokers require more space, fuel, and time. If you only grill once a month, skip the smoker. If you host large parties or enjoy experimenting with meat, a dual-purpose grill with a smoker box is a smart upgrade.
How Do You Maintain Your Barbecue Setup Year-Round?
Maintenance determines how long your equipment lasts. Clean your grates after each use while they are still warm. A quick scrape with a grill brush removes residue before it hardens. Deep clean your grill every three months by burning off debris at high heat and scrubbing the interior.
For gas grills, check burner tubes for blockages twice a year. Spiders and debris can clog the orifices and cause uneven flames. For charcoal grills, empty ash after every three uses. Ash traps moisture and accelerates rust. Cover your grill when not in use, even if it lives under a patio. A quality cover blocks UV rays, rain, and dust.
Seasonal Maintenance Checklist
- Spring: Deep clean, replace lava rocks or ceramic briquettes if needed.
- Summer: Wipe down exterior weekly, check propane tank levels.
- Fall: Store propane tanks upright, cover grill securely.
- Winter: Move grill to a sheltered spot or use a heavy-duty winter cover.
What Common Mistakes Ruin a Backyard Barbecue Setup?
The most common mistake is placing the grill too close to the house or under a low-hanging roof. Heat and grease can damage siding and create a fire hazard. Another frequent error is ignoring the surface beneath the grill. Grills should sit on non-combustible material like concrete, brick, stone, or gravel. Placing a grill on a wooden deck without a protective mat is risky.
Underestimating the need for lighting is another overlooked mistake. Evening grilling requires good task lighting. Clip-on LED lights or overhead string lights make a huge difference. Finally, many beginners buy a grill that is too small for their typical crowd. A 3-burner gas grill serves most families of four, but if you host twelve people regularly, step up to a 4-burner model to avoid cooking in batches.
How Do You Make Your Setup Look Inviting?
Appearance matters because an inviting setup encourages you to use it more. Start with a clean, organized station. Repaint or stain an old wooden cart to match your patio furniture. Add a colorful outdoor rug to define the cooking zone. Use matching ceramic or stainless steel serving bowls for a polished look.
Lighting also plays a role in ambiance. Warm string lights create a welcoming glow. Small potted herbs on your prep counter add greenery and fresh flavors. A dedicated beverage cooler or ice bucket keeps drinks close without crowding your cooking space. Keep the area clutter-free by storing rarely used tools in a sealed bin or cabinet.
Frequently Asked Questions
What is the best surface for a barbecue area?
Non-combustible surfaces like concrete, brick pavers, stone, or gravel are best. Avoid placing grills directly on dry grass or wooden decks without a protective barrier.
How far should a grill be from the house?
At least 3 feet from any structure, including siding, railings, and overhanging branches. A 10-foot clearance is ideal for large smokers or high-heat searing.
Can I use a gas grill on a wooden deck?
Yes, but use a grill mat or a protective pad underneath to catch grease splatters and prevent heat damage to the wood. Keep the grill away from railings.
What size grill do I need for a family of four?
A 3-burner gas grill with about 400 to 500 square inches of cooking space works well. For charcoal, a 22-inch kettle grill is sufficient for most family meals.
How do I stop food from sticking to the grates?
Clean the grates thoroughly before heating, then oil them with a high-smoke point oil like avocado or canola oil using a paper towel held with tongs just before adding food.
Is a propane tank or natural gas better for a backyard setup?
Propane is portable and easier to set up. Natural gas is cheaper long-term and never runs out, but requires professional installation. Choose propane for flexibility, natural gas for permanent setups.
What is the easiest way to add smoke flavor without a smoker?
Use a smoker box filled with wood chips on a gas grill, or wrap soaked wood chips in foil and poke holes. Place the packet directly on the coals or burner for instant smoke.
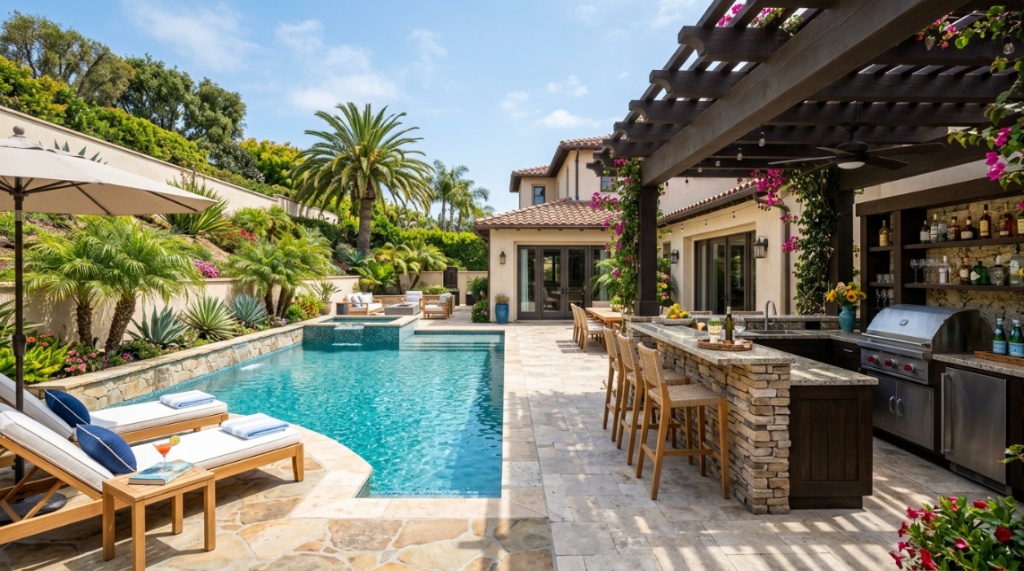
When designing your cooking zone, consider how the layout flows into the rest of your outdoor living space. Positioning your grill station near your patio seating or finding a Swimming Pool to Match Your Lifestyle creates a seamless, resort-style entertainment hub right in your backyard.
Conclusion
Building the perfect backyard barbecue setup does not require contractor-level skills or a six-figure budget. It requires thoughtful planning, the right grill for your lifestyle, and a layout that prioritizes workflow. Start with the essentials: a reliable heat source, a clean prep space, and a storage system that keeps everything within reach. Choose a grill that matches how often you cook and what you love to eat. Arrange your space so you can move from prep to grill to serving without wasted steps. Invest in a good thermometer and a quality grill brush before buying any fancy gadgets. Maintain your equipment through the seasons, and you will enjoy years of great food and good company. Now it is your turn. Take a look at your backyard, measure your space, and start building the outdoor kitchen you deserve. Your next barbecue will be the one everyone remembers.


